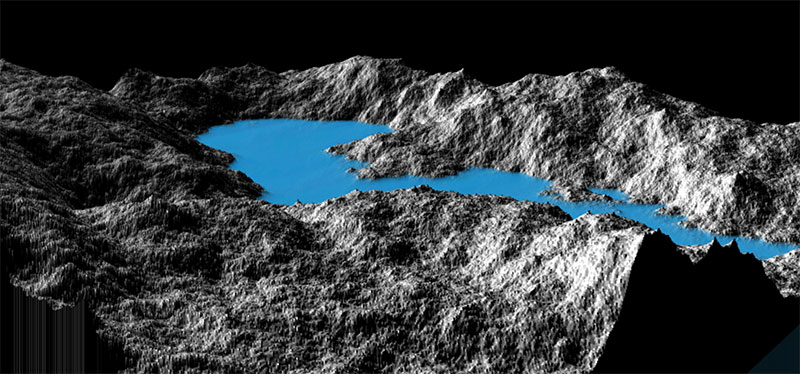
As programmers, we love to build things, and what could be more exciting than building a world? Minecraft, Terragen, Skyrim, and every flight simulator ever all use some sort of fractal terrain generation. Today we'll explore the beautifully simple diamond-square algorithm so you, too can play God. [Demo] [Source]
Programmers tend to be lazy (I speak from experience), and one nice side effect of laziness is really brilliant ways to avoid work. In this case, instead of spending mind-numbing hours manually creating what would likely be pretty lame rocky surfaces, we'll get spiritual and teach the computer what it means to be a rock. We'll do this by generating fractals, or shapes that repeat patterns in smaller and smaller variations.
I don't have any way to prove that terrain is a fractal but this method looks really damn good, so maybe you'll take it on faith.

Height maps
We'll store our terrain as a simple height map: a 2-dimensional array of values that represents the height of terrain at any given x, y coordinate. With this simple data structure, we can render the heights however we like - canvas, webgl, interpretive dance, etc. The biggest limitation is that we can't represent vertical holes in the terrain like caves, tunnels, or bridges.
function Terrain(detail) {
  this.size = Math.pow(2, detail) + 1;
  this.max = this.size - 1;
  this.map = new Float32Array(this.size * this.size);
}
You can apply this algorithm to any dimension of grid, but it's easiest with a square that's a power of 2 plus 1. We'll use the same value size for the x, y, and z axes, forming our terrain in a cube. We convert detail into a power of 2 plus 1, so higher detail renders larger cubes.
The algorithm
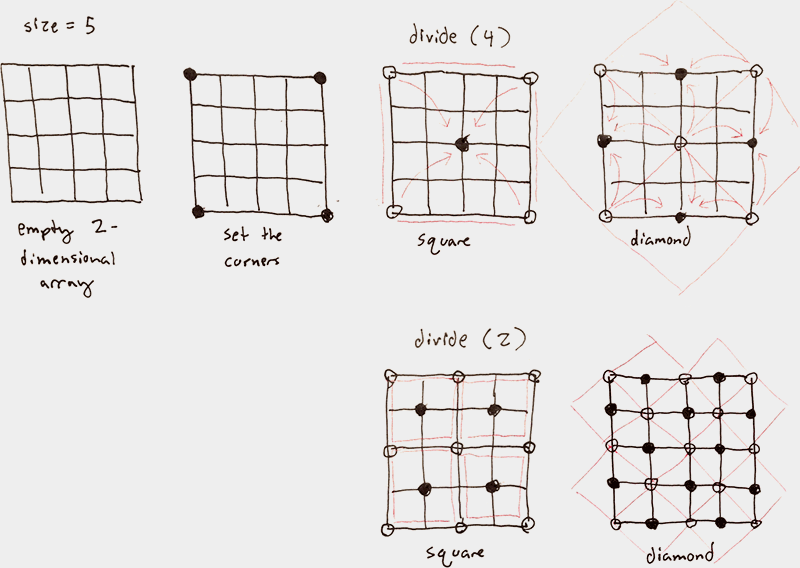
Here's the idea: take a flat square. Split it into four sub-squares, and move their center points up or down by a random offset. Split each of those into more sub-squares and repeat, each time reducing the range of the random offset so that the first choices matter most while the later choices provide smaller details.
That's the midpoint displacement algorithm. Our diamond-square algorithm is based on similar principles but generates more natural-looking results. Instead of just dividing into sub-squares, it alternates between dividing into sub-squares and dividing into sub-diamonds.

1. Set the corners
First, set the corners to a 'seed' value which will influence the rest of the rendering. This would start all the corners halfway up the cube:
this.set(0, 0, self.max / 2);
this.set(this.max, 0, self.max / 2);
this.set(this.max, this.max, self.max / 2);
this.set(0, this.max, self.max / 2);
2. Divide the map
Now, we'll recursively look at smaller and smaller divisions of the height map. At each division, we'll split the map into squares and update their center points during the square phase. Then, we'll split the map into diamonds and update their center points during the diamond phase.
divide(this.max);

function divide(size) {
  var x, y, half = size / 2;
  var scale = roughness * size;
  if (half < 1) return;

  for (y = half; y < self.max; y += size) {
    for (x = half; x < self.max; x += size) {
      square(x, y, half, Math.random() * scale * 2 - scale);
    }
  }
  for (y = 0; y <= self.max; y += half) {
    for (x = (y + half) % size; x <= self.max; x += size) {
      diamond(x, y, half, Math.random() * scale * 2 - scale);
    }
  }
  divide(size / 2);
}
The scale ensures that the size of our offsets decreases along with the size of our divisons. For each divison, we multiply the current size by roughness, which determines whether the terrain is smooth (values near zero) or mountainous (values near one).
3. The shapes
Both shapes work similarly, but draw data from different points. The square phase averages four corner points before applying a random offset, while the diamond phase averages four edge points before applying a random offset.
function diamond(x, y, size, offset) {
  var ave = average([
    self.get(x, y - size),      // top
    self.get(x + size, y),      // right
    self.get(x, y + size),      // bottom
    self.get(x - size, y)       // left
  ]);
  self.set(x, y, ave + offset);
}
Rendering
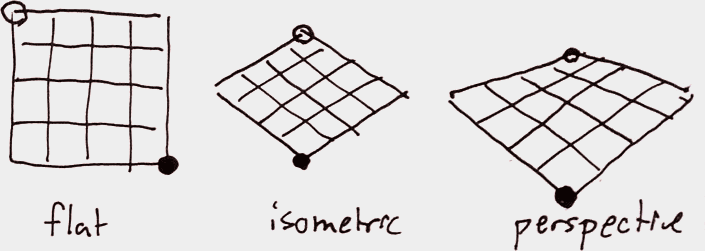
This algorithm just gives us data, which we can render in any number of ways. We'll combine a slew of rendering techniques into a rasterized, isometric, 3d-projected terrain map on a canvas element.

Back to front
First, we create nested loops that drew rectangles from the 'back' (y = 0) to the 'front' (y = this.size) of our map. This is the same loop you'd use to render a simple, flat, top-down square.
for (var y = 0; y < this.size; y++) {
  for (var x = 0; x < this.size; x++) {
    var val = this.get(x, y);
    var top = project(x, y, val);
    var bottom = project(x + 1, y, 0);
    var water = project(x, y, waterVal);
    var style = brightness(x, y, this.get(x + 1, y) - val);

    rect(top, bottom, style);
    rect(water, bottom, 'rgba(50, 150, 200, 0.15)');
  }
}
Light and shadow
Our naive approach to bump-mapping provides a nice visual texture. We compare our current height value against the next point's height value to find a slope. We draw brighter rectangles for higher slopes to fill one side with light and the other with shadow.
var b = ~~(slope * 50) + 128;
return ['rgba(', b, ',', b, ',', b, ',1)'].join('');
Isometric projection
We could draw everything head-on, but it's more visually interesting to rotate our square into a diamond before projecting it into 3d. Isometric projection aligns the top-left and bottom-right corners into the middle of the view.
function iso(x, y) {
  return {
    x: 0.5 * (self.size + x - y),
    y: 0.5 * (x + y)
  };
}
Perspective projection
We'll use a similarly simple 3d projection to convert our x, y, z values into a flat image with perspective on a 2D screen.
The basic idea behind any perspective projection is to divide horizonal and vertical position by depth so that higher depths render closer to the origin (ie, further away objects appear smaller).
  function project(flatX, flatY, flatZ) {
    var point = iso(flatX, flatY);
    var x0 = width * 0.5;
    var y0 = height * 0.2;
    var z = self.size * 0.5 - flatZ + point.y * 0.75;
    var x = (point.x - self.size * 0.5) * 6;
    var y = (self.size - point.y) * 0.005 + 1;

    return {
      x: x0 + x / y,
      y: y0 + z / y
    };
  }
};
Putting it all together
First, we create a new Terrain instance with our desired detail level. Then, we generate its heightmap, providing a roughness value between 0 and 1. Finally, we draw the terrain onto a canvas.
var terrain = new Terrain(9);
terrain.generate(0.7);
terrain.draw(canvasContext, width, height);
Try it out
Explore the otherworldly terrain.
What's next?
If you're anything like me, the results of this simple algorithm leave you itching to go build an online Terragen, a jetpack-based first person shooter, fishing simulator, MMORPG, etc. This single-cube, canvas-projected demo practically begs for extension.
Here are a few things I challenge you to try:
- WebGL rendering
- Variation by height, where lower altitudes are smoother (like sand) and higher altitudes are more rocky
- Cast shadows instead of purely slope-based shading
- A second pass that generates caves and tunnels
- Parallelize terrain building with WebWorkers
As always, get in touch if you'd like to riff on the ideas here.
Related Work
Lots of folks are playing with this algorithm right now and building cool stuff. Also, the Hacker News discussion brought out some really fantastic related examples. Here are some highlights:
- WebGL rendering implementation by callum
- Objective C implementation by Chris Cieslak
- Processing implementation by Jerome Herr
- Heightmap-based raycaster by namuol
- Procedural demo entry explanation by Inigo Quilez
- Fractional Brownian Motion by rbaravaelle
- Polygonal game map generation by Red Blob Games
Discuss
Join the discussion at Hacker News.